Sunday, January 20, 2013

Pin Tested: Tile Coasters

I thought my living room needed some brightly colored coasters and I thought these on Pinterest would be perfect!

Inspiration and Directions:
Pinned Image
I followed Lindsay's directions from her blog

Result: 


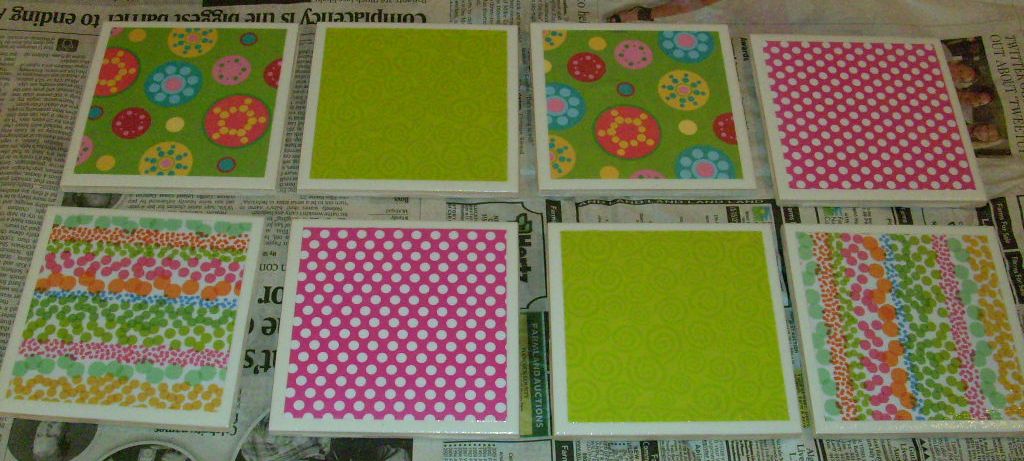
Pin Approved?: Yes, I love my cute and colorful coasters. I would suggest this project to others because the coasters serve their expected purpose and they were pretty inexpensive and easy to create. I have had so many other ideas for these coasters since I made mine - different colors of tiles could be used so I need more rooms in my house...
They would also make a great gift! 

Problems/Issues: I had my coasters stacked for awhile and the felt stuck to the coaster under it so now I don't stack them. I'm not sure if a different glue or sealer would fix this or if it was due to the conditions in my apartment. 

Tuesday, January 15, 2013

Pin Tested: Sweater Leg Warmers

A co-worker wore these last week and they looked store-bought so I was very surprised when she told me that she made them! She explained her procedure for me, but I could not do a craft project without checking on pinterest first.
Inspiration:
Pinned ImagePinned Image


Pinned Image 
(photos link to source)

Cost and Materials:
  • Sweater (I got mine from a resale shop for about $4 - many thrift/resale shops are having sales on winter clothes right now)
  • Fabric Scissors
Process:
  1. Lay sweater on floor
  2. Cut sleeves off of sweater (my legs are short so I didn't need to cut all the way to the shoulder)
  3. Wear them!
My method was just like Brie's (the second picture in the inspiration section)


End Result:  


Problems/Trouble-Shooting:
I'm expecting that the edges of mine will ravel a bit. I could fix these by using Sandra's method and adding a bit of fabric glue and folding over the cut edge. (She made a scarf too. And I bought two sweaters a second pair of legwarmers and a scarf may be in my crafting future...)

Pin Approved?:
Yes, I love my sweater leg warmers! I think they help add something new to my commonly worn boots!
I have a second sweater that I want to use for this project. I might make the scarf (from my 3rd inspiration picture) too.

Have you made a wearable craft based on instructions from Pinterest? How did it turn out?

Your Fellow Crafter,
Rachel

Monday, January 14, 2013

Pin and Tell: Fabric-Covered Brick Book Ends

My Inspiration and Directions:
Pinned Image
http://pinterest.com/pin/131589620331903824/
Bad News: This pin does not link to directions
Good News: This project is so easy that it does not really need directions (basically, you just wrap two garden bricks like a gift with fabric)

Cost and Materials:
  • Bricks
  • Fabric
  • Glue (I believe I used a hot glue gun)
Cost is under $10.

End Result:


Biggest Flaw: Maybe my cookbooks are too heavy, but sometimes they fall over when you take a book off the shelf.
Suggestion to Make Better: Make the seams on the longer side of the brick so they edge they sit on is more smooth, but you have to have super nice wrapping skills...

Rachel Approved?: Yes, despite the little flaw, I love my bookends. They are cute and practical. 


Pin on,
Rachel 

Sunday, January 13, 2013

Show and Tell - Flower Art

I completed quite a few projects before I started writing this blog and I thought I would share them in Show and Tell type posts. Here is the first of many.

My Inspiration:
Pinned Image
http://pinterest.com/pin/131589620332053429/
Where I got my instructions: 

Materials/Cost:
  • 3 Canvases (two came in a pack with others that I was using for another project)
  • Scrapbooking paper (I already had all of them - I just went through my scrapbooking bin to find colors that work well together)
  • Paint (I used arcrylic because I didn't want to spray paint outside in the winter, but spray paint would work well too)
  • Hot Glue Gun
  • Foam Brush
  • Sissors
I spent about $10-15 on this project. It might be a little more if you didn't have so many of these items.

Finished Product:


Your Fellow Pinterest Fan,
Rachel 

Follow Me on Pinterest

Saturday, January 12, 2013

Pin Tested: Ranch Oyster Crackers


I made Ranch Oyster Crackers for the holidays and again for a trivia night I participated in last night.
This is a super easy recipe:
1.      Preheat oven to 250 degrees
2.      In large mixing bowl, combine:
o    1 package (1oz) ranch dressing/dip mix
o    1/2 c. canola or veggie oil (I had a canola/veggie oil mix so I used that)
o    1/2 t. garlic powder
o    1 t. dried dill weed (I didn’t have any so I didn’t add it)
o    salt to taste (my generic oyster crackers were pretty salty so I didn't add any)
3.      Stir in oyster crackers and mix to coat
4.      Pour crackers onto large cooking sheet
5.      Bake 15 min - stirring about every 5 min
6.      Cool and store in covered container
I had read in some comments on the Examinar website (the recipe I followed) about using pretzel nuggets. I tried this for the trivia night and it was a wonderful variation! The only real change I made to the recipe was that I cooked them for about 30 min and stirred them every 10-15 min.

I brought home an empty bowl and heard lots of praise so the pretzels must have been enjoyed!
(I forgot to take a before picture - When I make them again, I'll add a picture in this post)


Tuesday, January 8, 2013

Pin Tested: Framed To Do List

I've been meaning to make a framed to do list like this or this for a while now.
Supplies
I already had the supplies: a frame, paper, letter stickers, and a dry erase marker. It was a pretty simple project.

1. Cut paper to size of frame (I used the frame insert as a template so I didn't even have to trace anything)
2. Add letter stickers - I used these cute black glitter stickers to write "to do" and then added the little * for a bit of interest
3. Put inside frame
4. Write with dry erase marker on the glass

The only thing left more me to do is to decide if I want to keep it in my apartment or move it to my (super small) desk at work.
All Finished!